
Contents
It is important that you use the workbook called IAworkbook_Batch.xls supplied with your InstantAtlas software. It is located in the ‘workbooks’ folder created during the installation of your InstantAtlas software. By default the path to this file is C:\Program Files\EsriUK\InstantAtlas\ workbooks. It is important to use a copy of IAworkbook_Batch.xls because it contains several worksheets called ‘Publisher-xxx’ that have functions in column B. These functions can be seen by clicking on a cell in this column and looking at the ‘name box’ in the top left corner of Excel. This will contain a function name instead of the cell address, i.e. ‘ConfigFile’ instead of ‘B7’. These functions are required for the Batch Publisher to work. Note that it is not possible to use your clipboard to copy and paste the contents of the functions of one of the Publisher worksheets to another workbook. If you need to copy the whole Publisher worksheet inclusive the functions, you should do this by right-clicking the name of the worksheet at the bottom and select ‘Move or Copy…’.
The example that is used below is for post code sectors in Edinburgh. Imagine that you have the data for these and you wish to split the post code sectors into five separate dynamic reports representing different parts of Edinburgh: Centre, North, South, East and West. You do not wish to manually click through the normal Publisher wizard five times to publish the five individual reports – instead you wish to use the Batch Publisher.
The Geography and Filters Worksheet
The ‘Geography and Filters’ worksheet should be edited first. Columns A and B should contain the code and name of every post code sector in Edinburgh. Optionally, column C can contain a URL to an external file containing supporting information for each post code sector. Column D will be the split column that defines which report each post code sector will be published in (see image below). Columns E onwards should contain any filters you wish to include in your report.
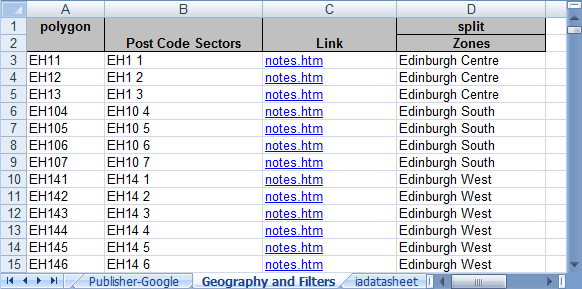
Cell D1 must contain ‘split’. Cell D2 can be used optionally to supply aname for your split column although – this is just for your benefit as it is not used by the software. From row 3 downwards the split column must contain the name of a part of Edinburgh. Post code sectors with the same value in column D will be published in the same report. Note that no filter columns have been included in this example. These could be added in columns E onwards if required and the entry in row 1 would be ‘filter’ for any filter columns.
The Datasheets
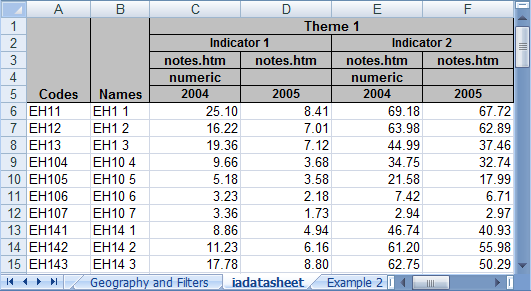
Enter your data values into one or more datasheets. In this example, there is just one theme, two indicators and two time periods per indicator.
The Publisher Worksheet
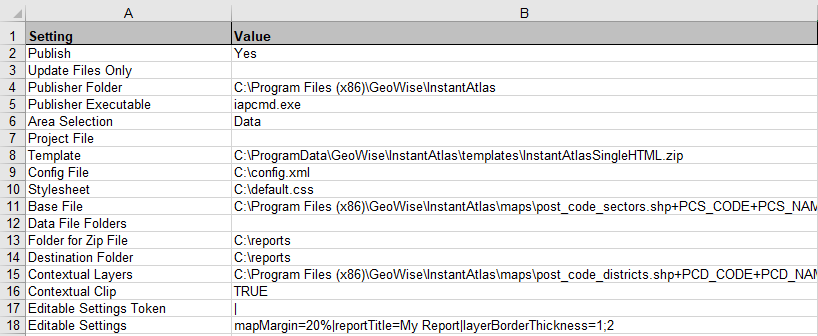
For the Batch Publisher to work you need a worksheet called ‘Publisher’ in your Excel workbook. The example workbook IAworkbook_Batch.xls contains 4 examples of this worksheet depending on what kind of background mapping you wish to use. The functions behind the cells are the same in all four ‘Publisher-xxx’ worksheets and you can change one into another by changing the values in column B. The different Publisher worksheets are simply included as examples to make it easier for you to set up your own Publisher worksheet.
To make one of the Publisher worksheets active you need to rename it to be called ‘Publisher’.
The values you put into column B of the Publisher worksheet control the Batch Publisher. Each setting is described below. Not all of them are mandatory. Note that the default settings make use of the shape files supplied with the InstantAtlas software.
The settings of row 2 to row 18 are identically in all four example Publisher worksheets.
Publish: this can either be set to ‘Yes’ or ‘No’ according to whether you wish to use the Batch Publisher or not.
Update Files Only: this should be left blank if you wish to Publish a new set of reports. If you only want to update the data files in a set of already published reports, you should set this property to ‘Yes’. The data files will be saved into subfolders of the destination folder if these subfolders have the same name as the split values.
If you have published a set of reports using one of the 6.10.0 (or later) templates, you will have to re-export the data files with this setting set to ‘Yes’.
Publisher Folder: the full pathname for the folder in which the command line interface publisher executable (iapcmd.exe) is located.
In all example Publisher worksheets this is:
‘C:\Program Files\EsriUK\InstantAtlas’.
Publisher Executable: the name of the command line version of the Publisher. This should always be ‘iapcmd.exe’
Area Selection: This should be set to ‘Data’ if you wish the reports to only include the base geography features which are part of the respective split value. If you wish to display a map for all the areas of the base geography map file (not just for those that will show data in your report) use ‘Base’.
Project File: If you have all setting for your batch reports already saved in an InstantAtlas Publisher project file you can enter the full path to this file here. The settings from the project file will override all other settings of the Publisher worksheet with exception of the data file. The data will be the data from within your Excel workbook.
Template: the full pathname for the template you wish to use. The templates are archives (zip) located in the ‘templates’ folder which was created as part of your InstantAtlas installation. The default folder is located at:
C:\ProgramData\EsriUK\InstantAtlas\templates
In all example Publisher worksheets we have used the following:
‘C:\ProgramData\EsriUK\InstantAtlas\templates\InstantAtlasSingleHTML.zip’
Config File: optionally you can enter the full pathname for a custom configuration file (config.xml) that you wish to be used for the published reports. If you do not enter a pathname, the template default configuration file will be used.
In all example Publisher worksheets this is ‘C:\config.xml’.
Stylesheet: optionally you can enter the full pathname for a custom style sheet (default.css) that you wish to be used for the published reports. If you do not enter a pathname, the template default style sheet will be used.
In all example Publisher worksheets this is ‘C:\default.css’.
Base File: This setting is made up of:
1. the full pathname for the digital map file (ESRI shapefile, MapInfo MID/MIF, MapInfo TAB file) containing the base geography for the series of reports you wish to publish,
2. the feature code field in your base geography digital map file (note that this field has to be upper case and that the codes of your digital map file must be exactly the same as those in column A of the Geography and Filters worksheet),
3. the feature name field in your base geography digital map file (note that this field has to be upper case) and
4. optional – the label for the base geography that will be displayed in the legend of your published reports. If you do not specify a label, the layer will be shown in the legend with its original map file name.
These parameters must be delimited by a ‘+’ sign.
In all example Publisher worksheets the selected digital map file is an ESRI shapefile called ‘post_code_sectors.shp’ that contains post code sector boundaries for Edinburgh. This file is saved onto your computer during the installation of InstantAtlas. The default location is C:\Program Files\EsriUK\InstantAtlas\maps
ESRI shapefiles have a .shp file extension (e.g. districts.shp). MapInfo interchange (also referred to as MID/MIF) files have a .mif file extension (districts.mif). MapInfo Table files (TAB files) have a .tab extension (districts.tab). All are accompanied by supporting files. You must have a digital map file in one of these formats to be able to publish a dynamic report (a .shp .mif or .tab file). You will also need a .dbf file with the same name as the .shp file (districts.dbf) or a .MID file with the same file name as the .MIF file (districts.MID). For TAB files, you will need a range of other supporting files including .DAT, .ID, .MAP and .IND. These files need to be located within the same folder as the digital map files. Supporting files should all be supplied with either your shapefile, MID/MIF or TAB files by the provider of your digital map data.
The field in the chosen digital map file (post_code_sectors.shp) that contains codes is called ‘PCS_CODE’. The names are stored in the field called ‘PCS_NAME’.
The label for the legend shall be ‘Post Code Sectors’.
Connecting these parameters together using the ‘+’ sign results in:
C:\Program Files\EsriUK\InstantAtlas\maps\post_code_sectors.shp+ PCS_CODE+PCS_NAME+Post Code Sectors
If you wish to create reports with more than one base geography layer, please refer to section Creating Multiple Geography Reports.
Data File Folders: Leave this property blank if you wish to create reports with just one base geography layer. You will only need this property if you want to create Multiple Geography Reports using the Batch Publisher. Please refer to section Creating Multiple Geography Reports.
Folder for Zip File: the full pathname for the folder in which you want the zipped reports to be saved.
In all example Publisher worksheets this is ‘C:\reports’.
Destination Folder: optionally you can enter the full pathname for the folder to which you want the zipped reports to be unpacked to. This can be the same folder as that specified for the ‘Folder for Zip File’ setting. If you do not enter a pathname, the zipped reports will not be unpacked.
In all example Publisher worksheets this is ‘C:\reports’.
Contextual Layers: optionally you can enter the full pathnames to any contextual layers you wish to include in your reports. For each contextual geography you must supply the following:
a. The full pathname for the digital map file (shapefile, MID/MIF or TAB)
b. The feature code and name fields in the digital map file (both upper case)
c. The label for the contextual geography that you wish to be displayed in the Map Layers list of the published reports
This information should take the form of a semi-colon delimited list. For each contextual geography, information should be delimited by a ‘+’ sign.
In this example a single contextual layer has been entered as ‘C:\Program Files\EsriUK\InstantAtlas\maps\post_code_districts.shp+PCD_CODE+PCD_NAME+Post Code Districts’. The digital map file is an ESRI shapefile called ‘post_code_districts.shp’. The feature code and name fields in this digital map file are called ‘PCD_CODE’ and ‘PCD_NAME’ respectively. The label for the contextual geography that will be displayed in the published reports is ‘Post Code Districts’.
If you wanted to add a digital map file with Local Authorities as a second contextual geography, your entry might look like this:
‘C:\Program Files\EsriUK\InstantAtlas\maps\post_code_districts.shp+ PCD_CODE+PCD_NAME+Post code districts; C:\local_authorities.shp+ LA_CODE+LA_NAME+Local Authorities’
Contextual Clip: this field should be set to ‘True’ if you wish to include only contextual geography features that overlap the base geography. If you wish to include all contextual geography features you should set this to ‘False’.
Editable Settings Token: This character should be used as a delimiter between multiple Editable Settings (see next property below). In the example the token is a pipe symbol (‘|’)
Editable Settings: optionally you can enter a list of editable settings. As a delimiter you need to use the character defined in the ‘Editable Settings Token’ property. In the example workbook the map margin is set to be 20%, the report title is ‘My Report’, the border width of the base layer is 1px the contextual layer has a border width of 2px.
This is a list of available editable settings:
| Editable Setting | Example |
| mapMargin | mapMargin=20% |
| Description: Sets the distance between the border of the map component and the base layer.* | |
| reportTitle | reportTitle=My Report |
| Description: Changes the title of the atlas.html page. The title is displayed in the title bar of your browser and in the browser tab. | |
| layerVisible | layerVisible=true;false;true |
| Description: A semi-colon delimited list of ‘true’ or ‘false’ values to set if the map layers are visible in the map by default. The first value defines the visibility of the base layer followed by the visibility settings for the contextual layers in the same order as defined in the ‘Contextual Layer’ property. | |
| baseLayerSymbolSize | baseLayerSymbolSize=18 |
| Description: Sets the size of the legend symbols for the base layer. Does not apply when proportional points or lines are used. Max and min sizes for proportional symbols can be set in the Designer. | |
| contextualLayerSymbolSize | contextualLayerSymbolSize=12;15 |
| Description: A semi-colon delimited list of pixel values to set the size of the legend symbols for the contextual layers. | |
| baseLayerFillOpacity | baseLayerFillOpacity=0.7 |
| Description: Sets the opacity for the base layer. 0 means totally transparent and 1 means totally opaque. | |
| contextualLayerFillOpacity | contextualLayerFillOpacity=0;1 |
| Description: A semi-colon delimited list of opacity values for the contextual map layers in the same order as defined in the ‘Contextual Layer’ property. 0 means totally transparent and 1 means totally opaque. | |
| baseLayerFillColor | baseLayerFillColor=#cccccc |
| Description: Sets the fill colour in hexadecimal format for the base layer. This colour appears when a feature is not part of the legend classification, e.g. when it is not part of an applied filter. | |
| contextualLayerFillColor | contextualLayerFillColor=#ffcc00;#0000ff |
| Description: A semi-colon delimited list of fill colours in hexadecimal format for the contextual map layers in the same order as defined in the ‘Contextual Layer’ property. | |
| layerBorderThickness | layerBorderThickness=1;1.5;2 |
| Description: A semi-colon delimited list of pixel values for the digital map layers. The first value defines the border thickness of the base layer followed by the border thickness settings for the contextual layers in the same order as defined in the ‘Contextual Layer’ property. | |
| contextualLayerBorderColor | contextualLayerBorderColor=#ffcc00;#0000ff |
| Description: A semi-colon delimited list of border colours in hexadecimal format for the contextual map layers in the same order as defined in the ‘Contextual Layer’ property. | |
| baseLayerBorderColor | baseLayerBorderColor=#000000 |
| Description: Sets the border colour in hexadecimal format for the base layer. | |
| layerShowLabels | layerShowLabels=false;false;true |
| Description: A semi-colon delimited list of ‘true’ or ‘false’ values to set if labels should show in the map for the map layer features. The first value defines the visibility of feature labels for the base layer followed by the visibility of feature labels for the contextual layers in the same order as defined in the ‘Contextual Layer’ property. | |
| layerMinLabelExtent | layerMinLabelExtent=0;0;10000 |
| Description: A semi-colon delimited list of minimum label extents in map units for the map layers. The first value defines the minimum label extents for the base layer followed by the minimum label extents for the contextual layers in the same order as defined in the ‘Contextual Layer’ property. For layers which are not supposed to show labels (layerShowLabels=false), the layerMinLabelExtent value can be left blank. | |
| layerMaxLabelExtent | layerMaxLabelExtent=1000000;1000000;500000 |
| Description: A semi-colon delimited list of maximum label extents in map units for the map layers. The first value defines the maximum label extents for the base layer followed by the maximum label extents for the contextual layers in the same order as defined in the ‘Contextual Layer’ property. For layers which are not supposed to show labels (layerShowLabels=false), the layerMaxLabelExtent value can be left blank. | |
| baseLayerShowDataTips | baseLayerShowDataTips=true |
| Description: Sets if the base layer features should show data tips when hovered with the mouse. | |
| contextualLayerShowDataTips | contextualLayerShowDataTips=true;false |
| Description: A semi-colon delimited list of ‘true’ or ‘false’ values to set if the contextual layer features should show data tips when hovered with the mouse. To be set in the same order as defined in the ‘Contextual Layer’ property. | |
| baseLayerShowInLayerList | baseLayerShowInLayerList=true |
| Description: Sets if the base layer should appear in the legend. | |
| contextualLayerShowInLayerList | contextualLayerShowInLayerList=false;true |
| Description: A semi-colon delimited list of ‘true’ or ‘false’ values to set if the contextual layers should appear in the legend. To be set in the same order as defined in the ‘Contextual Layer’ property. | |
| contextualLayerIconPath | contextualLayerIconPath=C:\icon.png |
| Description: A semi-colon delimited list of paths to icon files which the map shall display for contextual point layers instead of the default circle. To be set in the same order as defined in the ‘Contextual Layer’ property. | |
* Possible values for map margins are: none, 1%, 2%, 5%, 10%, 20%, 30%, 40%, 50%, 60%, 70%, 80%, 90% and 100%. If you use Google Maps as a background layer we suggest you use ‘none’ since the map will adjust itself to one of the zoom levels provided by Google maps.
The values for the settings in row 19 to 32 are different in each of the four example Publisher worksheets.
Background Type: Please specify here the type of background layer you wish to include into your reports. Valid values are ‘Raster’ (for a raster background image collection locally saved on your computer or a shared drive), ‘WMS’ (for a Web Map Service), ‘ArcGIS’ (for an ArcGIS Server/ ArcGIS Online connection) and ‘Google’ (for Google Maps). If you do not want to include any background mapping, please leave this property and all following settings blank.
Using a Raster Image Collection as a Background Layer
If your Background Type is ‘Raster’, please refer to the worksheet ‘Publisher-Raster’.
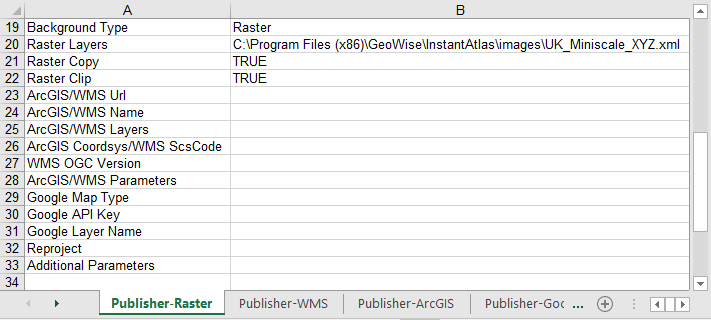
Raster Layers: Optionally you can enter the full pathnames to any background mapping index files (xml).
In the example this is ‘C:\Program Files\EsriUK\InstantAtlas\images \UK_Miniscale_XYZ.xml’.
If you wanted to add a second index file, your entry might look like this:
‘C:\Program Files\EsriUK\InstantAtlas\images\UK_Miniscale_XYZ.xml; C:\Program Files\EsriUK\InstantAtlas\images\os250k.xml’
Raster Copy: This field should be set to ‘True’ if you wish background mapping images to be copied to the output folders of the published reports. Note that images files will only be copied over if they are located in the same folder as the index files. If you do not wish background mapping images to be copied to the output folders of your published reports, set this to ‘False’.
Raster Clip: This field should be set to ‘True’ if you wish to display only background images that overlap the base geography in your published reports. To display all background images, set this to ‘False’.
Using a Web Map Service as a Background Layer
If your Background Type is ‘WMS’, please refer to the worksheet ‘Publisher-WMS’.
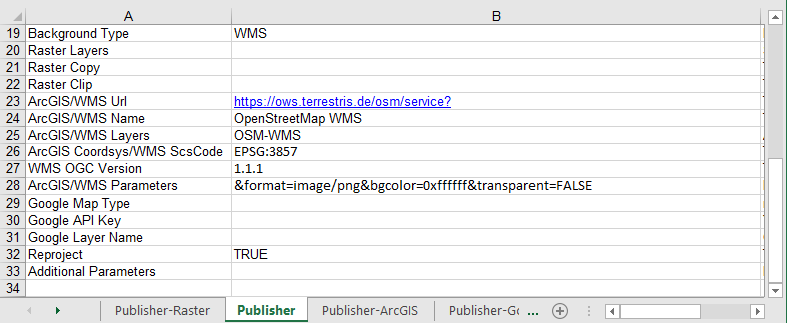
ArcGIS/WMS Url: Optionally you can include a Web Map Service as a background mapping. Therefore type the URL for the WMS into this field.
In the example a connection to the OpenStreetMap WMS from ‘terrestris’ in the Germany is used. If you wish to use this WMS, please ensure you read the guidance notes at https://www.terrestris.de/en/openstreetmap-wms/.
ArcGIS/WMS Name: The name of the WMS layer as it will appear in the legend of your report. All background layers will show with their specific name in the legend.
If you don’t know the values for the following settings you might want to request the properties of the WMS with the GetCapabilities request. Therefore type into the URL field of your internet browser the url of the WMS you want to use followed by ‘&REQUEST=GetCapabilities’. This will offer you a file in xml format with the properties of the WMS including coordinate system, version number, available image formats and available layers.
ArcGIS/WMS Layers: A comma delimited list of WMS layers you want to include.
ArcGIS Coordsys/WMS ScsCode: This is the coordinate system of the WMS. For the WMS from terrestris this is ‘EPSG:3857’
WMS OGC Version: The version number of the WMS. For the terrestris WMS this is ‘1.1.1’. This field is mandatory if you want to have the Batch Publisher re-project your map layers into the WMS projection.
ArcGIS/WMS Parameters: Parameters for image format, background colour and transparency. The parameter names are ‘format’, ‘bgcolor’ and ‘transparent’ and they must have an ampersand (‘&’) as a prefix.
In the example workbook we have chosen:
‘&format=image/png&bgcolor=0xffffff&transparent=FALSE’
Reproject: For a WMS background to work, all map layers need to be in the same projection as the WMS. Set this property to ‘True’ if you wish the Batch Publisher to re-project your map layers. If your map layers are already in the correct projection you should set this property to ‘False’. Please refer to ‘Adding Images from a WMS Connection’ for important information on the re-projection functionality and its limitations.
Since the demo map files for Edinburgh post code sectors and districts are not in the terrestris WMS projection, this property is set to ‘True’ in the example.
Using an ArcGIS Server/ArcGIS Online connection as a Background Layer
If your Background Type is ‘ArcGIS’, please refer to the worksheet ‘Publisher-ArcGIS’.
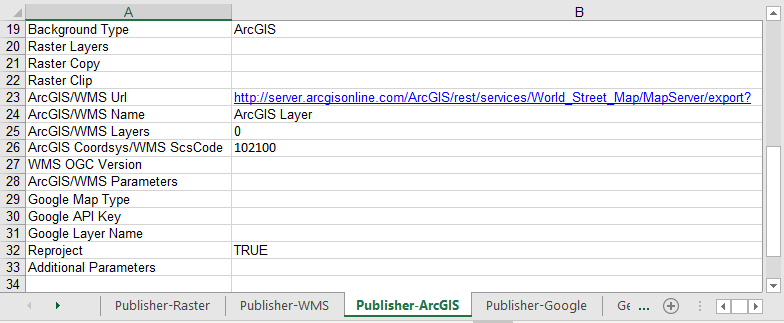
The properties ArcGIS/WMS Url, ArcGIS/WMS Name, ArcGIS/WMS Layers, ArcGIS Coordsys/WMS ScsCode, ArcGIS/WMS Parameters and Reproject should be used respectively as explained for the WMS background layer.
The example shows the settings for the ArcGIS World Street Map connection in the coordinate system Web Mercator Auxiliary Sphere (102100). This connection contains a single layer which is called ‘0’.
Using Google Maps as a Background Layer
If your Background Type is ‘Google’, please refer to the worksheet ‘Publisher-Google’.
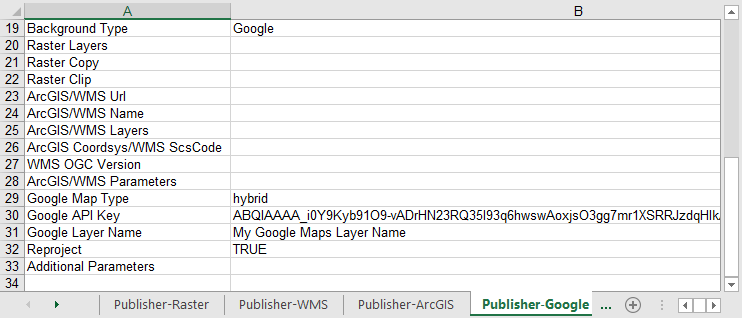
Google Map Type: This is where you can set the default Google Map type that loads with the report. Settings include ‘normal’ (for street map), ‘satellite’, ‘hybrid’ or ‘physical’ (for terrain). The end-user can switch between these map types via a drop-down list in the map component.
In the example the hybrid map type is chosen.
Google API Key: For Google Maps to work on a web server, you will need to provide an API (Application Programming Interface) Key. Please refer to the Google Maps API documentation on how to obtain an API key. For use on a local drive you do not need an API key.
Google Layer Name: All background layers will show with their specific name in the legend.
Reproject: For a Google Maps background to work, all map layers need to be in the same projection as Google Maps. This projection is called Web Mercator Auxiliary Sphere. If you wish the Batch Publisher to re-project your map layers for you set this property to ‘True’. If your map layers are already in the same projection as Google Maps, you should set this property to ‘False’. Please refer to ‘Google Maps in InstantAtlas Reports’ for important information on the re-projection functionality and its limitations.
Since the demo map files for Edinburgh post code sectors and districts are not in the Google Maps projection, this property is set to ‘True’ in the example.
Additional Parameters: This is a place holder for any additional parameters that you might want to include into your batch reports. Please leave this blank unless you are told otherwise by your support provider.