
Contents
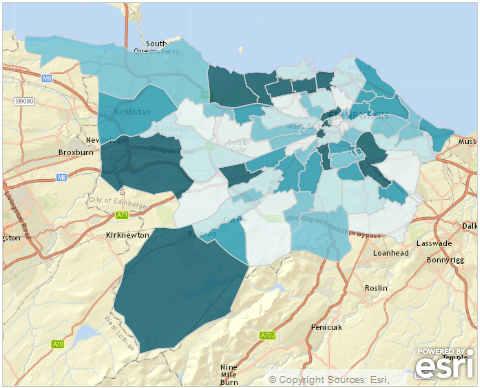
This step of the publishing process involves choosing background images if these are required. Background images appear in the map(s) of your report to provide additional context and can be switched on and off. The image shows the map in a dynamic report with background mapping switched on.
![]() The use of map data is subject to the terms of the provider and it is the responsibility of the owner of the report ensure compliance.
The use of map data is subject to the terms of the provider and it is the responsibility of the owner of the report ensure compliance.
The background images for a report can come from the following sources:
- A collection of images on a local or network drive
- A Web Map Service (WMS)
- An ArcGIS Server map service
- OpenStreetMap
- Google Maps
![]() When adding multiple background images to a map in a report, it is necessary to check that the coordinate systems of all of the background images are identical to ensure that they will be shown properly in the map.
When adding multiple background images to a map in a report, it is necessary to check that the coordinate systems of all of the background images are identical to ensure that they will be shown properly in the map.
Adding Images from a Background Image Collection
Any geo-referenced images saved on a local or network drive can be displayed as background mapping. We strongly recommend that each image is no larger than 1 MB in file size. It is important to keep the file size down as the larger the images, the longer it will take for them to load into a report. If your images are larger than 1MB, you can process them to reduce their file size or you can split one image into separate tiles (the report will only load the tiles it needs to fill and map at any given point in time).
To include a layer of background mapping, you must upload an index file into the Publisher. Each layer must have a separate InstantAtlas index file. This index file is an XML file (.xml) that specifies geographic coordinates for each image included in the layer of background mapping. Without this information, InstantAtlas reports would be unable to position background images correctly in the map(s). A sample index file can be found in the ‘images’ folder created during the installation of your InstantAtlas software. This folder is a convenient place to store all of your background images and index files. It is important that an index file is stored in the same folder as the images that it references.
![]() Information on how to create a background mapping index file can be found here: Creating a Background Mapping Index File.
Information on how to create a background mapping index file can be found here: Creating a Background Mapping Index File.
Click the ‘Add’ button to upload an index file and click the ‘Background Image Collection’ option. You can type the pathname to the index file into the ‘Index file’ box (e.g. ‘C:\images\250k.xml). You can also access a drop down list of the most recently used index files by clicking the arrow to the right of the ‘Index file’ box. Alternatively, click the ‘Browse’ button to search for an index file located elsewhere on your computer or network.
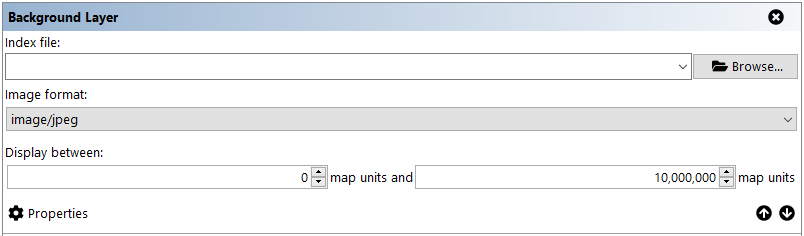
The publisher needs to know the file extension of any images that are used. We support JPEG and PNG image formats for use as background mapping, so please specify your image format here. If your images are not in either of these formats you will have to convert them.
The ‘Min extent’ and ‘Max extent’ boxes define the range of map widths at which this background mapping layer will display in your report. The units are map units and therefore depend on the geographic coordinate system of your map files. For example, if the coordinate system is British National Grid the units will be metres. The smaller the ‘Min extent’ value, the further you have to zoom into the map before this background mapping layer disappears. The greater the ‘Max extent’ value, the further you have to zoom out of the map before this background mapping layer disappears.
The layer shown in the image above will never switch on if the map is displaying an area that is more than 100,000,000 map units wide. If the area shown in the map is less than 100,000,000 map units wide, this background mapping layer will display, no matter how far you zoom into the map.
You might decide to add a second background mapping layer by clicking the ‘Add’ button and browsing for a new index file called ‘detailed.xml’. Imagine that the images referenced by ‘detailed.xml’ are more detailed than those referenced by ‘coarse.xml’.
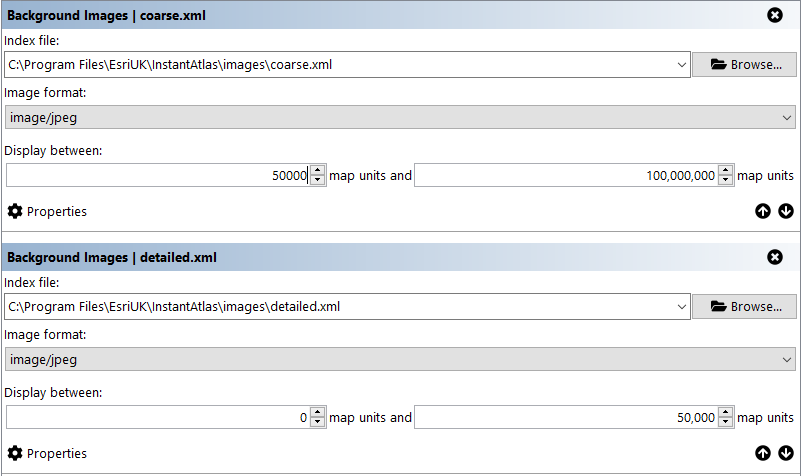
You can see that the ‘Min extent’ and ‘Max extent’ values have been edited. The coarser (or less detailed) background mapping layer is set to display for map widths between 50,000 and 100,000,000 units. The more detailed background mapping layer is set to display for map widths between 0 and 50,000 map units. As you zoom into the map in this report, you will reach a point at which the area shown is less than 50,000 map units wide. At this point, the background mapping will switch from one layer (the images referenced by ‘course.xml’) to another (the images referenced by ‘detailed.xml’).
![]() If you have multiple layers of background mapping, you must ensure that the ranges you specify for the layers do not overlap.
If you have multiple layers of background mapping, you must ensure that the ranges you specify for the layers do not overlap.
If you wish to make more advanced settings for background mapping, click the ‘Properties’ button for a layer. The ‘Choose Map Features’ dialog will appear.
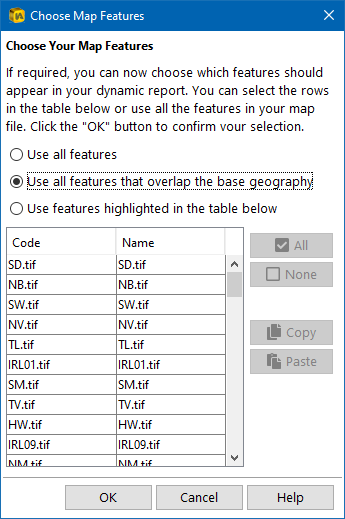
By default, only the background images that overlap (or intersect) the base geography will be published in the report. As the maps in InstantAtlas reports are centred on the base geography, images that do not overlap the base geography are typically irrelevant. This is therefore the default option.
If, however, you wish to publish all images referenced by the index file irrespective of whether they overlap the base geography or not then click the ‘Use all features’ radio button. If you wish to select a particular subset of images to publish in the report, click the ‘Use features highlighted in the table below’ radio button and make your selection.
When you have made your choice, click the ‘OK’ button. Alternatively, click the ‘Cancel’ button to cancel your selections.
![]() InstantAtlas reports only support JPG and PNG as formats for background mapping. File extensions listed in index files are irrelevant and are not used by the Publisher – it is important only that the name of the file (excluding the extension) in the index file matches the name of the JPG or PNG image it relates to.
InstantAtlas reports only support JPG and PNG as formats for background mapping. File extensions listed in index files are irrelevant and are not used by the Publisher – it is important only that the name of the file (excluding the extension) in the index file matches the name of the JPG or PNG image it relates to.
At the foot of the screen you are asked whether you wish to copy background images to the output folder of your report. The output folder is the folder in which the Publisher saves the published report. By default, InstantAtlas reports look for background images in their output folder. For this reason you will typically switch the radio button to ‘Yes’. Note that Publisher will only be able to copy images to the output folder if it can find these in the same folder as the index file(s) you have uploaded.
![]()
If you have chosen to include a large number of background mapping images in your report, you might decide to click the ‘No’ radio button. The images will not be copied to the output folder and after publication you will have to configure your report to look for images in a different folder. This is for file management reasons: if you have a large number of background images, it is not ideal to replicate these in the output folder of every report you publish. It is more efficient to store the images in one folder and configure each of your reports to read the images from this folder. To configure a report to read images from a different folder you must use the InstantAtlas Designer – please consult section ‘The InstantAtlas Designer’, sub-section ‘Map Properties’ under ‘Background Folder’ for more details.
Adding Images from a WMS Connection
The Web Map Server Connection allows you to build in background layers that come directly from a WMS (Web Map Service) compliant mapping server. You can find out more about the WMS specification at http://www.opengeospatial.org.
This option is really intended for users that wish to connect to their own organisation’s WMS. Although public WMS resources can be found, they are in most cases unsuitable for background mapping in reports.
To add images from a WMS, enter the URL address for the WMS service in the Server address box e.g.
https://ows.terrestris.de/osm/service?
This URL is provided by ‘terrestris’, a German company that specialises on the processing and presentation of spatial data with GIS.
If you wish to use this WMS, please ensure you read the guidance notes at https://www.terrestris.de/en/openstreetmap-wms/
When you hit the refresh button, a list of available map layers should appear in the box below:
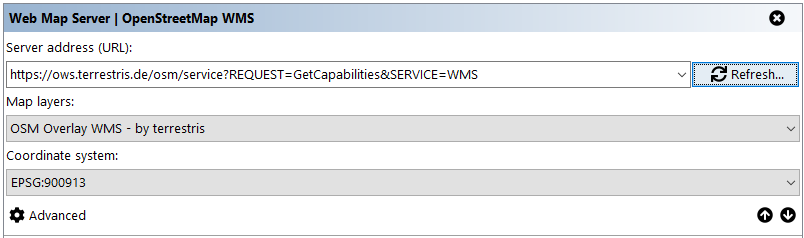
Pick the relevant layer from the drop down box.
Finally you should pick a coordinate system for the map to come back in. Three of the most commonly used coordinate systems will be EPSG: 4326 for decimal degrees of latitude and longitude, EPSG:3857 for WGS 84 / Pseudo-Mercator used in Google Maps, OpenStreetMap, etc. and EPSG: 27700 for UK national grid.
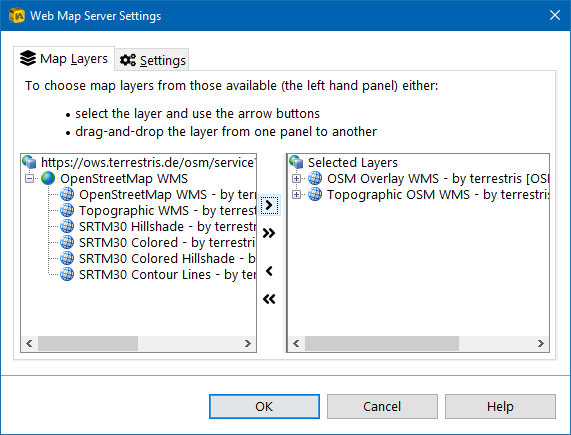
It is possible to specify further WMS options, such as multiple layers, image formats and transparency by clicking the ‘Advanced’ button. This will launch the Web Map Server Settings dialog box as shown in the image below.
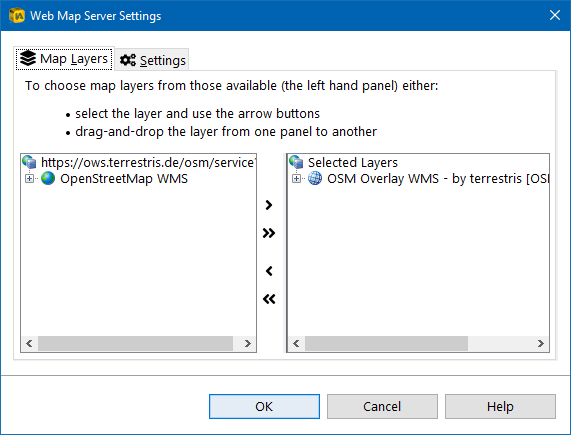
The available list of map layers can be found in the left hand side box, and layer groups can be expanded and collapsed. To add layers, navigate through the groupings ![]() to a map layer
to a map layer ![]() . Select the layer(s) you wish to add and click the
. Select the layer(s) you wish to add and click the ![]() button to move it to your selected layers list as shown in image below.
button to move it to your selected layers list as shown in image below.
Layers can be removed individually using the ![]() button.
button.
Further settings can be changed by clicking the Settings tab which will open up the dialog box shown below.
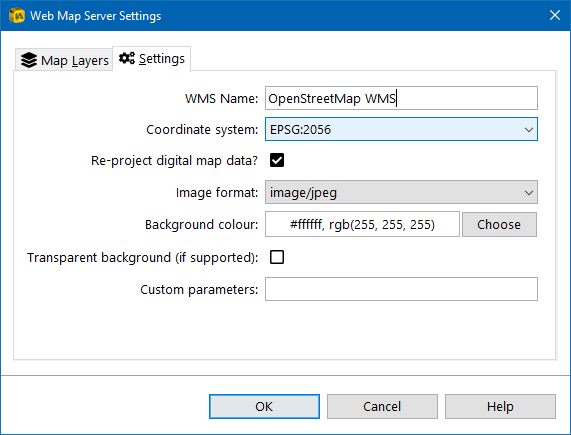
Here you can change the name of the WMS Layer. This name will appear in the legend of your dynamic report.
You can choose the coordinate system in which the WMS will send the image data to the report. The ‘Re-project digital map data?’ property is ticked by default, which means that the Publisher will re-project all base and contextual layers that you have uploaded for your report to match the coordinate system of the WMS.
![]() It is vital that you consider the following points:
It is vital that you consider the following points:
1. This re-projection only works if the Publisher knows the coordinate system of your map files. If you are using ESRI shapefiles that include a .prj file, the Publisher can pick up the coordinate system information out of this file. If your shapefile does not have a .prj file or if you are working with MapInfo MID/MIF or TAB files, you will need to select the appropriate coordinate system from the Layer Properties in the ‘Coord System’ tab. Alternatively you can re-project these map layers before using them in InstantAtlas.
2. The re-projection will only work if your map file(s) are in one of the following supported coordinate systems
a. Un-projected coordinate systems (e.g. latitude/longitude)
b. Coordinate systems that use a Transverse Mercator projection (e.g. British National Grid, UTM zones)
c. Global coordinate systems using a Mercator projection.
d. Lambert Conformal Conic projection
If your map layers are already in the same projection as the WMS you should untick this property.
The image format drop-down returns a list of all available image formats supported by the Web Map Server you are connecting too. Please note that while a large variety of formats may be supported by the WMS server, InstantAtlas will currently only support JPEG (.jpg), PNG (.png) and GIF (.gif) formats, so it is important that one of these formats is chosen.
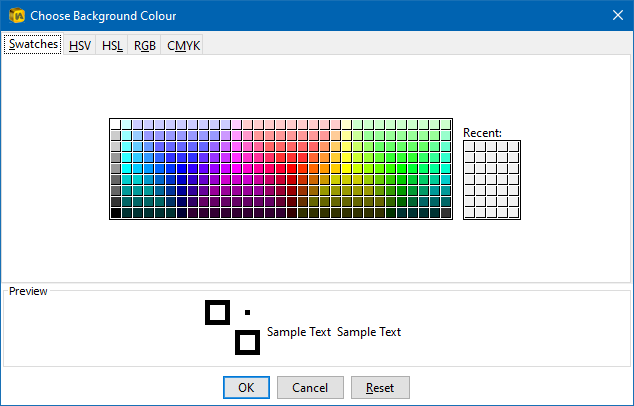
It is also possible to specify the background colour of the image you request. Imagine choosing a layer that specifies land cover. Rather than leaving the background (areas of no data) white by default, you may wish to request this in blue to represent areas of water. Select the colour you wish to use by clicking the Choose button and selecting a colour from the available palettes. Once you have selected a colour, click ‘OK’ to return to the previous dialog screen.
Finally, there is a checkbox option to request the image with a transparent background. This option is dependent upon the WMS server supporting the provision of transparent background images. If not, this request will be ignored by the server. If transparency is supported, take care to also select an image format that supports transparency from the image format drop down list. Formats that support transparency are .png and .gif.
The image shows a typical request. The transparent background check box is ticked, and we have chosen an appropriate image format that will handle this transparency if the server supports it. If transparency isn’t supported, the image will revert to having a blue background colour.
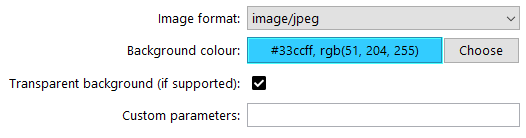
If the WMS you want to use requires additional parameters, you can enter these into the ‘Custom parameters’ field.
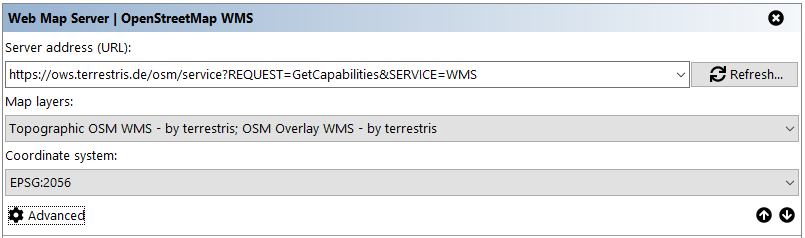
When you have finished choosing your advanced settings, click ‘OK’ to return to the ‘Choose Your Background Images’ screen. The dialog may have been updated to reflect any additional layers that have been chosen. For example, the image below shows we have chosen ‘Topographic WMS – by terrestris’ and ‘OSM Overlay WMS – by terrestris’ as our two map layers.
![]() There are a number of issues you should consider when using WMS background mapping:
There are a number of issues you should consider when using WMS background mapping:
- Many WMS servers will only support certain coordinate systems and these must match those of your base and contextual geographies. The Publisher can re-project your map layers to match the WMS projection if you have provided information about the coordinate system(s) of your digital map layers.
- In InstantAtlas you cannot control scale thresholds for WMS layers.
- Many WMS servers will limit the scales that you can request data for. So even though the layer may not appear in your map this may be because you need to zoom in further.
Adding Images from a ArcGIS Server Map Service
The ArcGIS Server option allows you to incorporate background mapping from a service in ArcGIS Server such as ArcGIS Online. ArcGIS Online provides ready-to-use map services with coverage for many countries. You can find more information about ArcGIS Online Basemaps here:
https://livingatlas.arcgis.com/en/browse/#d=2&cont=esriOnly&categories=Basemaps:10000
As an example of incorporating ArcGIS Online maps you can click the ArcGIS Server option and paste the URL below into the box:
https://server.arcgisonline.com/ArcGIS/rest/services/World_Street_Map/MapServer?
The way the Publisher handles ArcGIS Server map services is very similar to WMS connections. Please refer to the previous section to get further information on this. You will, however, not be able to choose a different background colour for your ArcGIS Server map service.
Adding Images from OpenStreetMap
The OpenStreetMap Connection option allows you to add a background map provided by OpenStreetMap (OSM).
OpenStreetMap is a collaborative project to create a free editable map of the world. The resulting free map can be viewed and downloaded from the OpenStreetMap server:
Adding Images from Google Maps
There is a dedicated section in this user guide explaining how to create an IA dynamic report with a Google Maps background. Please refer to section ‘Google Maps in InstantAtlas Reports’.