
This step of the publishing process involves choosing contextual geographies if these are required. Contextual geographies are displayed in dynamic reports to provide context to the map(s). They are not used for thematic mapping as this role is reserved for the base geography. You may choose multiple contextual geographies for your dynamic report if you wish.
There are two types of contextual layers. You can either upload a digital map file into the Publisher or you can use a GeoRSS connection to feed the geographic features on-the-fly into your report (requires internet connection).
Digital Map Files as Contextual Layers
As with the base geography, digital map files should be uploaded in either ESRI shapefile (.shp), MapInfo interchange file (.mif) or MapInfo table structure (.tab) format.
For example, you might wish to show district boundaries as an overlay to a base geography consisting of post code sectors. In the image below, the district boundaries have been set to be red and thicker than the sector boundaries (light grey).

You can upload digital map files of polygon, line or point geometry type. In the above image, a polygon type digital map file was uploaded as the contextual geography. The image below shows an example of a point digital map file uploaded as a contextual geography.

You can show labels for contextual layers by ticking the ‘Display labels?’ setting in the layer properties in the Publisher. Please see section Layer Properties of Contextual Geography Layers.
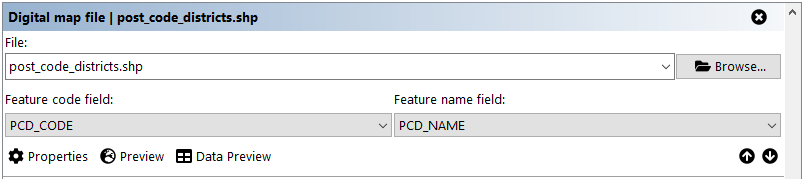
To add a digital map file as a contextual layer, click the ‘Add’ button and select ‘Digital Map File’.

A new ‘Digital map file’ box appears. Type the pathname to a digital map file into the ‘File’ box or click the arrow to the right to access a list of recently used map files. Alternatively, click the ‘Browse’ button to browse for a map file on your computer or network. In the ‘Feature code field’ drop down list select the field containing codes. Contextual layers are for context only and no data are matched to them so the codes you select are not critical (they could be the same as the names for example). They must be unique however and different from any codes used in the base geography or other contextual geographies.
In the ‘Feature name field’ drop down list select the field containing names. This should not contain any nulls.
The ‘Preview’ and ‘Data Preview’ buttons work in the same was as described in section ‘Geo-Preview and Data Preview’
![]() The 1 MB rule that was described in section ‘Choose Your Base Geography’ also applies to contextual geography map files. Furthermore, the digital map files uploaded as contextual geographies should have the same geographic coordinate system as the digital map file uploaded as the base geography. If this is not the case, your contextual geographies may not appear in the published report. If the coordinate systems of your digital map file differ significantly, the Publisher will produce a warning after clicking the ‘Publish’ button at the end of the Publisher.
The 1 MB rule that was described in section ‘Choose Your Base Geography’ also applies to contextual geography map files. Furthermore, the digital map files uploaded as contextual geographies should have the same geographic coordinate system as the digital map file uploaded as the base geography. If this is not the case, your contextual geographies may not appear in the published report. If the coordinate systems of your digital map file differ significantly, the Publisher will produce a warning after clicking the ‘Publish’ button at the end of the Publisher.
Layer Properties of Contextual Geography Layers
You can edit the layer properties by clicking on the ‘Properties’ button. In the ‘Settings’ tab, you can change the layer name as it appears in the report as well as the feature code and name fields. You can also edit any other properties listed. Hold your mouse pointer over the name of the property to see a longer description.
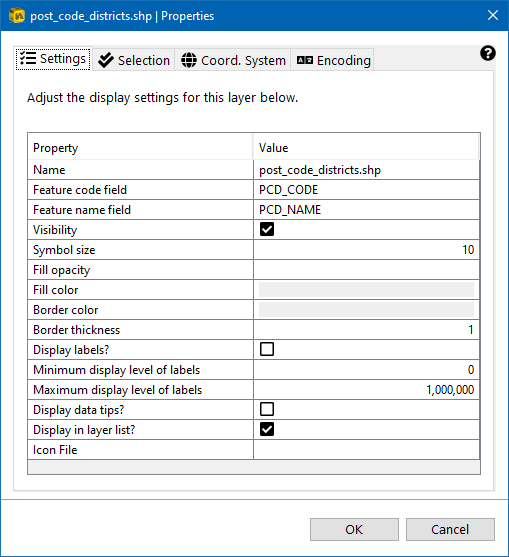
If your contextual layer is a point layer you might wish to upload an icon file which will be displayed in the map for each of the points. This icon replaces the default circle symbol.

Valid icon formats are JPG and PNG. If you would like to have a transparent background, you need to create a PNG file since the JPG format does not support transparency.
Some of the most common symbols in the different colours can be found in the installation folder of your InstantAtlas software, in a subfolder called ‘icons’. The default location for this is:
C:\Program Files\EsriUK\InstantAtlas\icons
For line or polygon contextual layers the Icon File property should be left blank.
Note that it is also possible to change the layer properties after the publishing process by editing the map.js file in a text editor (see section ‘Important Files‘), however it is advised that you adjust them here in the Publisher if you wish to change these settings.
If you edit the properties and click the ‘Selection’ tab, the following dialog will open.
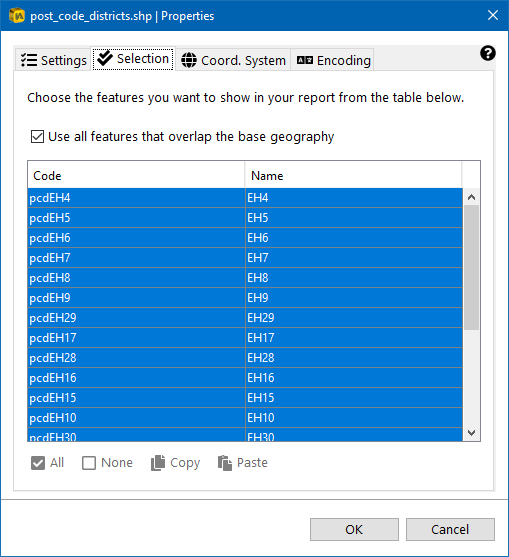
By default, only the geographic features that overlap a box around the base geography will be published in the report. As the maps in InstantAtlas reports are centred on the base geography, contextual features that do not overlap the base geography are typically irrelevant. This is therefore the default option.
If, however, you wish to have control over which features in the contextual geography are published, then un-tick the checkbox ‘Use all features that overlap the base geography’. You can now either leave the default of all features selected or select a subset of features.
The tabs ‘Coord. System’ and ‘Encoding’ work in the same was as described in section ‘Layer Properties of Base Geography Layers’.
When you have made your choices, click the ‘OK’ button. Alternatively, click the ‘Cancel’ button to cancel your changes.
GeoRSS Feeds as Contextual Layers
If you wish to include a GeoRSS feed as a contextual layer into your report you can do this by clicking the ‘Add’ button and selecting the ‘GeoRSS Connection’ option.

Then type the link to the GeoRSS feed into the URL field.

If you wish to change the layer name or display settings of the layer you can do this by clicking on the ‘Advanced’ button. Please ignore the ‘Icon File’ property since this is not supported for GeoRSS feeds.
GeoRSS Feeds are structured in XML format, usually providing a <title> tag and a <content>, <summary> or <description> tag for each geographic feature.
If labels get activated it will show the value of the <title> tag for each entry of the GeoRSS as a label. If tooltips get activated the value of the <content>, <summary> or <description> tag will appear. If none of these three is available, the report will show the value of the <title> tag also in the tooltip.
To add multiple contextual layers click the ‘Add’ button again and choose either the ‘Digital Map File’ option or the ‘GeoRSS Connection’ depending on what kind of contextual layer you wish to add. For any contextual layer, you can click the cross ![]() to delete it at any time. You can use the green up/down arrows
to delete it at any time. You can use the green up/down arrows ![]() to re-order your geographies.
to re-order your geographies.