
Selecting a Layer
This step of the publishing process involves choosing a digital map file for the base geography for your report. A digital map file is simply a representation of geographic features in digital format (as opposed to a paper map for example). Base geography is defined as the set of geographic features that you wish to produce a thematic map for. For example, if you have crime statistics for community districts in New York and you wish to make a thematic map of these, the base geography for your InstantAtlas report will be New York community districts.
There is the option to publish a report with multiple base geographies. If you would like more information on this please refer to section ‘Multiple Geography Reports’.
Digital map files come in a number of different formats, three of which are supported by the Publisher:
1. ESRI shapefile
2. MapInfo interchange file
3. MapInfo Table Structure file
ESRI shapefiles have a .shp file extension (e.g. districts.shp). MapInfo interchange (also referred to as MID/MIF) files have a .mif file extension (districts.mif). MapInfo table structure files have a .tab extension (districts.tab). All are accompanied by supporting files. You must have a digital map file in one of these three formats to be able to publish a dynamic report.
The supporting files required will depend on which file format you have your digital map data in. For ESRI shapefiles you will also need a .dbf file with the same name as the .shp file (districts.dbf) For MapInfo interchange files you will need a .MID file with the same file name as the .MIF file (districts.MID). Finally for MapInfo TAB files, you will need a number of additional files with the same filename but with the following extensions: .DAT, .ID, .MAP and .IND. These files need to be located within the same folder as the digital map files. Please note that all digital map files may be supplied with other supporting files not listed here – the extensions listed are the only ones explicitly required for use with the InstantAtlas Publisher. If you do not have digital map files for your geographies of interest, please contact your support provider.
Digital map files can be classified according to the geometry of the geographic features they describe:
1. Polygon (e.g. the boundaries of New York boroughs)
2. Lines (e.g. the Canadian rail network)
3. Points (e.g. cities in Scotland)
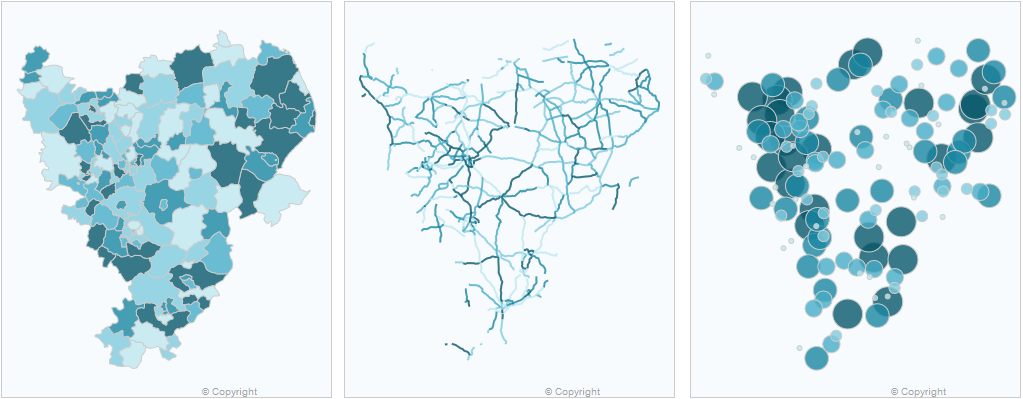
The Publisher supports the upload of digital map files of all three geometry types listed above. The geometry type of the digital map file you choose for your base geography dictates how the map(s) in your published report will look.
The image below illustrates how the map of your dynamic report will look if you publish using polygon, line and point digital map files as base geography respectively.
Digital map files can have different geographic coordinate systems. The Publisher will accept digital map files with any geographic coordinate system. If you publish a report and the geography in the map looks distorted you need to check the projection of your map files. If you need help with this, please contact your support provider.
You can type the pathname to a digital map file into the ‘File’ box. For example, you might type ‘C:\sectors.shp’ to select an ESRI shapefile called ‘sectors.shp’ located on the C: drive of your computer. You can also access a drop down list by clicking the arrow to the right of the ‘File’ box. This will list the most recently used digital map files and digital map files saved in the ‘maps’ folder of your InstantAtlas software.

Alternatively, click the ‘Browse’ button to search for a digital map file located elsewhere on your computer or network. This will open the ‘Choose your digital map file’ dialog. You can change the file type you are browsing for using the ‘Files of Type’ list at the bottom of the dialog.

![]() If the size of your map file exceeds 1 Megabyte (MB) the Publisher will warn you due to the possible negative impact on the performance (loading and response time) of your dynamic report. There are two interrelated reasons why the size of your map file might be large:
If the size of your map file exceeds 1 Megabyte (MB) the Publisher will warn you due to the possible negative impact on the performance (loading and response time) of your dynamic report. There are two interrelated reasons why the size of your map file might be large:
1. The features in your map file are very detailed
2. The number of geographic features in your map file is large
If the features in your map file are very detailed you can generalise (or simplify) them. You can remove nodes to reduce the detail of lines, merge geographic features, convert polygons to points, etc. If you need help to generalise your map files, please contact your support provider.
If the number of features in your map file is large you should consider publishing only a selection of the available features. It is difficult to specify a maximum number of base geography features because performance is ultimately a combination of many factors (such as the number of indicators included in the data files, the speed of an Internet connection the report is viewed over, the performance of the computer used to view the report, etc.). The guideline upper limit is 10,000 features but the only way to be sure whether the report will perform acceptably is to test this with your own data/Internet connection/computer/etc.
A digital map file not only stores the geometry of geographic features but also the attributes of each feature. These attributes are held in one or more fields, or columns, within the map file. To be used in InstantAtlas, your ESRI shapefile or MapInfo interchange or TAB file must have a field that contains codes identifying the geographic features. It should also have another field that contains the names of the geographic features if these are different from the codes.
For example, if you have a digital map file with the boundaries of post code sectors in Edinburgh (UK) it might contain two fields like this:
| CODE | NAME |
| EH111 | Sector EH11 1 |
| EH112 | Sector EH11 2 |
| EH113 | Sector EH11 3 |
| EH114 | Sector EH11 4 |
| Etc. | Etc. |
The Publisher will list all the available fields in the digital map file you have uploaded in the ‘Feature code field’ and ‘Feature name field’ drop down lists. In the example shown below the map file has six fields. Note that the names of fields in your map file can be anything. The name of the field is not important – it is the contents that are important.

In the ‘Feature code field’ drop down list select the field containing codes. Every feature must have a code in this field. The code for each feature must be unique. The Publisher will warn you (when you click the ‘Next’ button) if the field you have selected is not suitable. The field chosen must contain the codes of any features that will be used in the data file for your report.
In the ‘Feature name field’ drop down list select the field containing names. These names will be displayed in your report directly after publishing. However, if you do not have a suitable name field in your map file, simply select the same field as that selected in the ‘Feature code field’. You will be able to specify different names for geographic features in the data file(s) for your report (see section The InstantAtlas Excel Data Manager for more information on entering names).
If you are happy with your selections, you can now click the ‘Next’ button. Alternatively, you can click the Properties or Preview buttons.
Layer Properties of Base Geography Layers
Click the properties button to view the properties for the layer. The ‘Layer Properties’ dialog will open. If you wish to change theses settings, it is advised that you adjust them here in the Publisher even though it is also possible to change them after the publishing process by editing the map.js file in a text editor.

The ‘Settings’ tab allows you to change the name of the layer for display in the final dynamic report as well as the feature code and name fields. You can also edit any other properties listed. Hold your mouse pointer over the name of the property to see a longer description.
The ‘Selection’ tab allows you to select a subset of the geographic features in your map file.
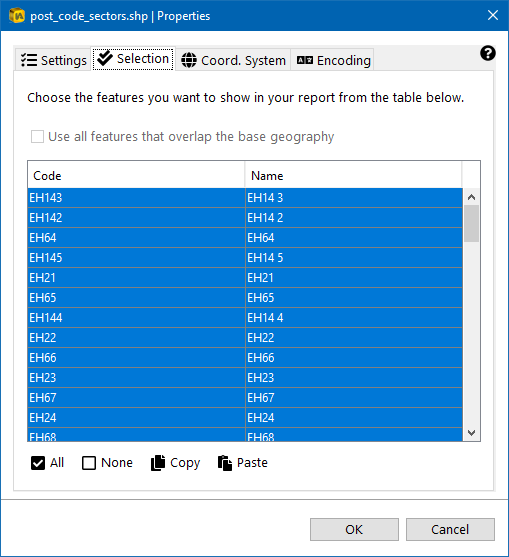
The contents of the fields you have selected will be displayed in the Code and Name columns in this dialog. You can click the column headings to sort the contents in ascending or descending order. You can also click and drag the divider between the two columns to change the width of the columns. By default all features are selected. This means that all the geographic features in your map file will be published in the report.
If you wish to publish a subset of the geographic features only, you can select or deselect features in the table. Hold down the ‘Ctrl’ button on your keyboard while you click to make multiple selections or de-selections. Use the ‘All’ or ‘None’ buttons to highlight all or no features respectively.

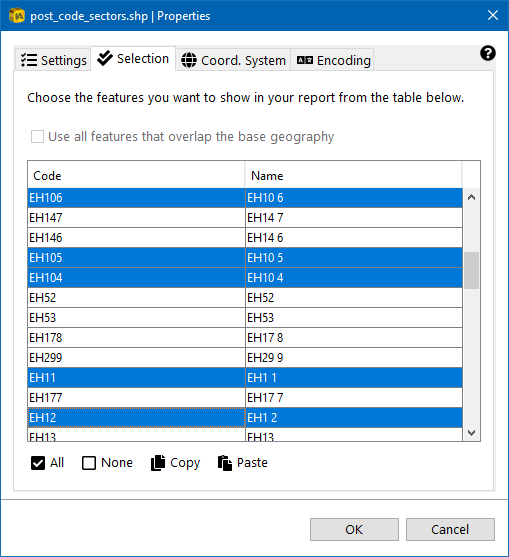
If you have a list of codes in another document (e.g. an Excel spreadsheet or a text file) you can copy and paste these into the Publisher to select your subset of geographic features. The codes in the list should be separated by a space or each on a new line.

The steps are the following:
1. Open the document containing your list of codes
2. Select the codes and copy them (Ctrl-C)
3. In the ‘Selection’ dialog of the Publisher, click the ‘Paste’ button
Any features with codes that exactly match those in your list will be automatically selected.
The ‘Coord. System’ tab allows you to select the coordinate system of the map layer. This is important if you want to add a WMS background layer, an ArcGIS Online / ArcGIS Server background layer or a Google Maps background layer into your report and use the Publisher to re-project your map files into the projection of the background layer (for more information about background layers please refer to section ‘Choose Your Background Images’). If you are using a shapefile that has a .prj file associated to it, the Publisher will pick up the coordinate system out of the .prj file automatically. If your shapefile does not have a .prj file or if you are working with MapInfo MID/MIF or TAB files, you will need to specify the coordinate system your map data is in.

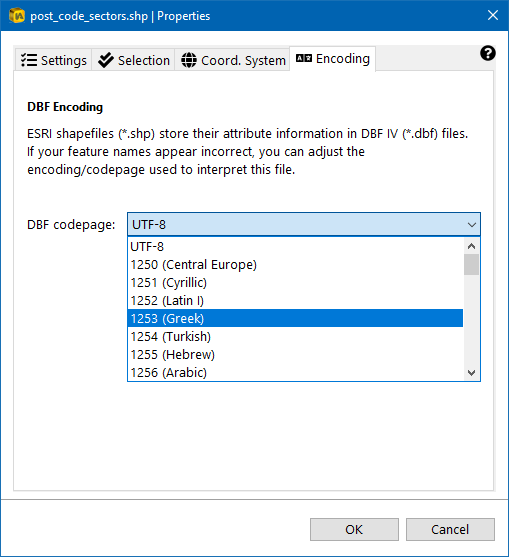
The ‘Encoding’ tab allows you to change the encoding setting for a DBF IV file. You only need to do this if you are using an ESRI shapefile (.shp) as your digital map file and the names of your geographic features are being displayed incorrectly in the dynamic report you publish. If this is the case, you can choose a more suitable encoding.
When you are happy with the properties for your layer, click the ‘OK’ button. Alternatively, click the ‘Cancel’ button to cancel any changes.
Geo-Preview and Data Preview
You can click the ‘Preview’ option for the layer if you wish to preview the geographic features you have chosen to publish. A new window will open showing your selection.

Click the ‘Data Preview’ option to see a simple table with all available attribute fields and their content. This can be helpful when choosing suitable code and name fields.
