
To export your data to InstantAtlas data files, you must have at least one active datasheet in your workbook. In other words, you must have at least one worksheet with a name that starts with ‘iadatasheet’ (this can be typed with upper or lower case characters).
Click the ‘Add-ins’ menu in Excel and then click the ‘IA Export’ button in the InstantAtlas toolbar. Alternatively click the ‘InstantAtlas’ menu and select ‘IA Export’.

If the Excel Data Manager detects any problems with your workbook it will inform you at this stage. If your workbook has been correctly formatted, a dialog box will open in which you are asked to select the file type. Data files for HTML dynamic reports need to be in JSON format.
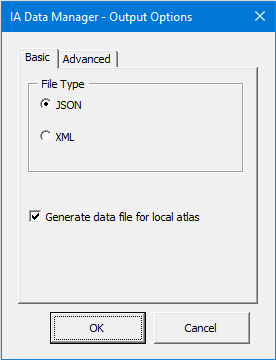
The XML format was historically used for Flash dynamic reports. It is still included for two reasons:
- For troubleshooting purposes, as it is easier for the human eye to read an XML data file than a JSON data file. Additionally, even when the JSON format is selected, the add-in exports the data first to XML and converts it to JSON as a second step. Being able to stop that process at the XML format allows for easier debugging.
- To generate an HTML table view of your data by using the data-xml-2-html.xslt file. This file is part of every InstantAtlas dynamic report and converts the data.xml file to an HTML table view if it gets called via the browser URL.
If you are using the atlas-launch.html file to view your report locally, you need to have the box ‘Generate data file for local atlas’ ticked. This will ensure that the Excel Data Manager will create the data.js file as well as the associated data-vars.js.js file for local use. Please note the special instruction when creating data files for multiple geography reports.
When you have made your selection, click on ‘OK’. You will now be prompted to browse to a destination folder. In most cases you will be creating data files for a dynamic report that has already been published, so you should choose the folder containing the report and click ‘Save’ (this will overwrite any existing ‘data.js’ / ’data.xml’ file).
![]() Note: if you are updating the data files belonging to an existing report that has been saved on a webserver, your audience might not see the changes to the data as their browsers might be caching older data files. Please see How to prevent the browser from caching the data files of an InstantAtlas dynamic report for further information.
Note: if you are updating the data files belonging to an existing report that has been saved on a webserver, your audience might not see the changes to the data as their browsers might be caching older data files. Please see How to prevent the browser from caching the data files of an InstantAtlas dynamic report for further information.
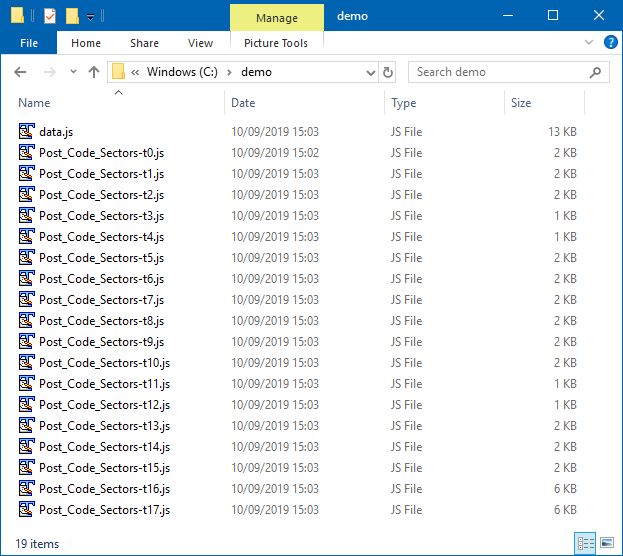
If your workbook only contains one active datasheet, by default one ‘data.js’ / ‘data.xml’ file will be created. If your workbook contains more than one active datasheet (e.g. iadatasheet1, iadatasheet2, iadatasheet3) then by default a ‘data.js’ / ’data.xml’ file will be created along with a separate data file for each theme in your workbook.
For example, if you have eighteen themes worth of data located in two or more datasheets in your workbook and you are exporting to JSON format, the set of JSON data files created will be as shown in the following image.
![]() If you are displaying a large number of indicators or time periods in your report, we recommend that you enter this data in two or more datasheets. This becomes increasingly important as the number of geographic features in the base geography of your report increases. By storing the data in multiple data files, you ensure that your report will load data as efficiently as possible.
If you are displaying a large number of indicators or time periods in your report, we recommend that you enter this data in two or more datasheets. This becomes increasingly important as the number of geographic features in the base geography of your report increases. By storing the data in multiple data files, you ensure that your report will load data as efficiently as possible.
In the ‘Advanced’ tab of the ‘Output Options’ dialog you can overwrite the default behaviour and choose whether or not the Excel Data Manager shall produce theme files or not. Please note the special instruction when creating data files for multiple geography reports.
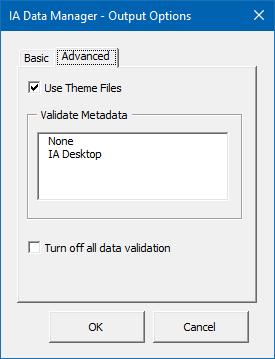
The ‘Advanced’ tab also provides the option for a more detailed validation of the ‘Metadata’ worksheet(s). If you wish to validate your metadata, select ‘IA Desktop’ from the list and then click ‘OK’. If the validation results in any errors or warning you will see a window listing them together with a brief description and a cell reference if applicable.
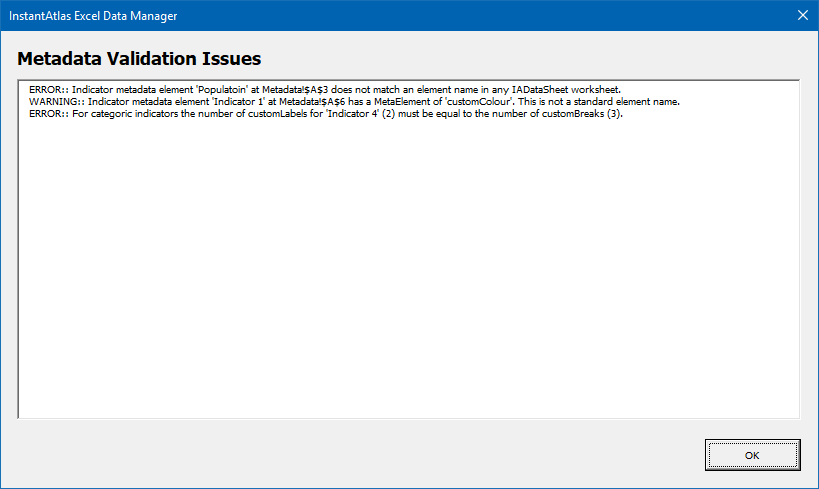
If errors are found, you should click ‘OK’ and correct the mistakes. If there are warnings only, you can choose to either cancel the export process by clicking on ‘Cancel’ or ignore them by clicking ‘OK’. If you click ‘OK’, you will be prompted to browse to the destination folder.
The ‘Turn off all data validation’ checkbox allows you to export the data from your Excel workbook without any data validation. This can significantly speed up the time it takes to export a large amount of data, however any errors that might exist in the excel workbook will not be picked up and the resulting data file will fail in the dynamic report. We suggest you only use this option if exporting your data takes more than 30min and if you have been able to export it at least once with data validation switched on (and have made only minor changes thereafter).
You may also need to excape special characters manually in your Excel workbook before using this feature:
| Special character | Escaped |
| & | & |
| “ | "e; |
| > | > |
| < | < |
| Any non-ascii character, so any character where the character code is not between 1 and 127 | &#<charactercode>; |