
How to activate the Excel Add-in
The InstantAtlas Excel Data Manager add-in is automatically copied to your installation folder when you install InstantAtlas. However, you will need to enable it in order for the InstantAtlas menu and toolbar to appear. If you have followed the instructions in the InstantAtlas Getting Started guide, you will already have enabled the add-in.
Excel 2016 and later
Open Excel. Click the ‘File’ tab in the ribbon and select ‘Options’ in the left hand menu.
This should launch the Excel Options Window. In the left hand pane, choose Add-ins which will bring up the list of installed add-ins and whether they are active (enabled) or not.
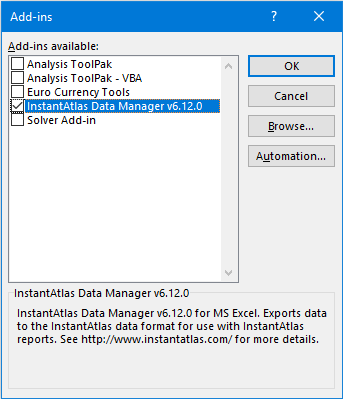
Initially the IA Data Manager may be in the list but it will not be active. To activate it, click the ‘Go…’ button at the bottom of the add-in screen in order to start managing your add-ins.
If the IA Data Manager is not present in the Add-Ins dialog, click ‘Browse…’ and browse to the file called ‘IA Data Manager.xla’ which is located in the root folder of the InstantAtlas Desktop installation, usually ‘C:\Program Files\EsriUK\InstantAtlas’, and click OK. It will now be available in the list of Add-Ins.
Select the InstantAtlas Data Manager from the checklist and click ‘OK’.
If you have multiple versions of the add-in available because you have upgraded from a previous version of InstantAtlas, please ensure that the most recent version has been enabled.
You will now need to close and then reopen Excel.
The add-ins tab should now display three new buttons. There is also a menu item called InstantAtlas from which these functions can also be selected.

The Buttons of the InstantAtlas Toolbar
This section of the user guide documents the ‘IA Export’ button. The ‘IA Merge Files’ button is used to create data files for multiple geography reports. Section ‘Multiple Geography Reports’ of this user guide gives detailed information on how to create multiple geography reports. The ‘IA Export for RB+’ button can be helpful for those customers, who are using the InstantAtlas cloud service apps Dashboard Builder or Report Builder and have their data already in an Excel workbook correctly formatted for InstantAtlas Desktop. Please refer to the following help pages for further information:
- Tips & Tricks for InstantAtlas Desktop users using Dashboard Builder
- Using data from an InstantAtlas Desktop Excel workbook in Report Builder
If you want to deactivate the add-in you should do the following:
How to deactivate the Excel Add-in
Excel 2016 and later
1. In Excel click the ‘File’ tab and select ‘Options’ in the left hand menu.
2. Select ‘Add-ins’ from the left hand side menu.
3. Click ‘Go…’ at the bottom of this pane, to Manage Excel Add-ins
4. The add-ins dialog will open, click the checkbox for the Excel Data Manager so that it is unselected.
5. Click ‘OK’ to close the dialog. You will see that the ‘InstantAtlas’ menu and toolbar have disappeared.