Overview
As an InstantAtlas Desktop user you might have been working on projects that you would like to replicate in Dashboard Builder. There are a few tricks that will help you to save time doing that.
Get your Excel Data Manager data into your dashboard
You are probably already using our Excel Data Manager Add-In that allows you to export data from an Excel workbook into an InstantAtlas Desktop report. We have improved this Add-In now so that it will also allow you to export the data into a file that can be uploaded to the InstantAtlas Dashboard Builder.
To use it please follow these steps:
- Check that you have the InstantAtlas Data Manager add-in version 6.10.0 or later installed. If not, download the latest Add-In file from here and install it in Excel. For information on how to do this please refer to this help page.
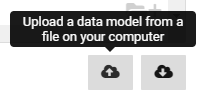
- In Excel, under the Add-ins tab, you can now find a new button called IA Export for RB+:

- Open your Excel workbook for InstantAtlas Desktop and add the following lines into the Metadata worksheet:
ElementType Element MetadataElement Value ArcGISOnline MapLayer idField ArcGISOnline MapLayer nameField ArcGISOnline DataLayer url - Fill the idField and nameField values with the correct code and name fields from the Feature Service that you use as your Data Layer in Dashboard Builder. Leave the url value blank for now.
- Click the IA Export for RB+ button in the Excel Data Manager add-in and save the files in a location that you can easily find. The tool will create a CSV file and a JSON file with the same names but different file extensions. The JSON file is still missing the URL of the CSV file so it can’t be used just yet.
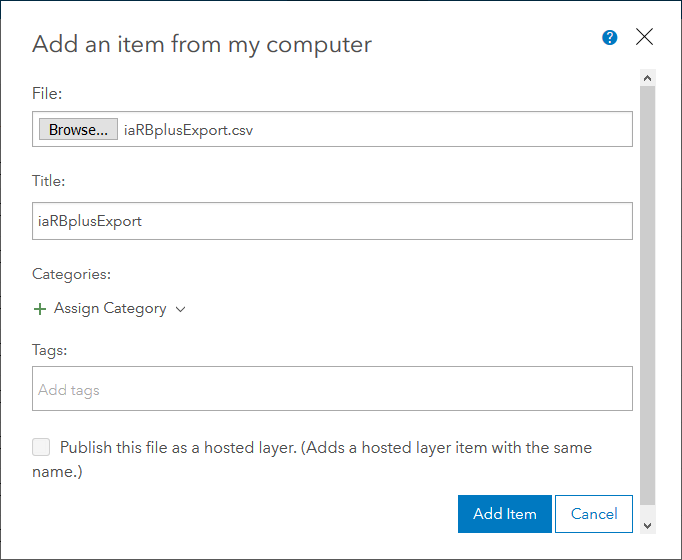
- Upload the CSV file to your ArcGIS Online account. Do not publish it as a hosted layer (remove the tick ‘Publish this file as a hosted layer…’).
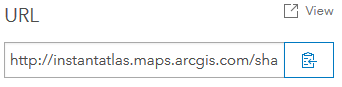
Once uploaded, share it with Everyone (public). - On the ArcGIS Online details page of the CSV file, scroll down until you see the URL in the right-hand side pane. Click the button to the right of it to copy the URL into your clipboard.
- Paste the URL to the CSV file into your Metadata worksheet as the value for url.
- Click the IA Export for RB+ button again and generate the two files again. We suggest you choose the same file name so that the old files are overwritten and you won’t pick the wrong one at the next step. The CSV file will be identical to the one created before, however the JSON file will now contain the correct URL to the CSV file within ArcGIS Online.
- Open (or newly create) your dashboard using Dashboard Builder. Click on the Data button at the top and then the Upload button at the bottom right of the dialog.
Select your JSON file to upload it. The themes, indicators, dates, associates, indicator notes links and metadata will be applied to the dashboard as defined in your Excel workbook.
Limitations:
- This approach will currently not allow you to keep the filters you have set in the Excel Data Manager.
- Notes links for geography features (those defined in the Geography and Filters worksheet) will not be transferred as they are not currently supported in Dashboard Builder.
Apply the design from an existing InstantAtlas Desktop report
You might have spent quite some time already designing and configuring your InstantAtlas Desktop reports. You can easily apply these report designs to your InstantAtlas Online dashboards by simply dragging and dropping the config.xml file from your local report folder into the browser with your dashboard.
Limitation:
- New functionality that will be implemented through Dashboard Builder updates cannot be applied to dashboards that use InstantAtlas Desktop config.xml files.